> ## Documentation Index
> Fetch the complete documentation index at: https://docs.symmetry.com/llms.txt
> Use this file to discover all available pages before exploring further.
# Quickstart: Look up taxes in Portal
> Log in to Payroll Point Portal and run your first lookup. Covers Maps tax search, nexus and nonresident certificate inputs, and an optional Batch walkthrough.
Payroll Point Portal provides a user interface to return precise state and local taxes for employees using Maps and Batch. This guide walks a new Portal user through logging in and running a first tax lookup.
Building your own integration instead? See the [Quickstart: Call the Payroll Point API](/prp/getting-started/api-quickstart).
## Before you begin
You'll need an authorization token to log in to Portal. If you don't have one, contact your Symmetry Client Success representative or reach out through the [Client Support Center](https://support.symmetry.com).
See [Prerequisites](/prp/getting-started/prerequisites) for the account configuration your administrator needs to complete, and the global settings that change which taxes are returned.
You will have different authorization tokens for the production and staging environments.
***
## Step 1: Log in
Navigate to Portal and enter your authorization token on the landing page.
* **Production:** [https://payrollpoint.symmetry.com](https://payrollpoint.symmetry.com)
* **Staging:** [https://payrollpoint-staging.symmetry.com](https://payrollpoint-staging.symmetry.com)
[ ](/prp/assets/images/39193919761172.png)
Before your first lookup, review [Global settings](/prp/portal/global-settings), which change which taxes are returned for everyone in your organization. You can also adjust [Maps display settings](/prp/portal/maps-settings) for how boundaries and map views are drawn.
***
## Step 2: Run your first maps lookup
Maps returns taxes for a single employee's home and work address pair.
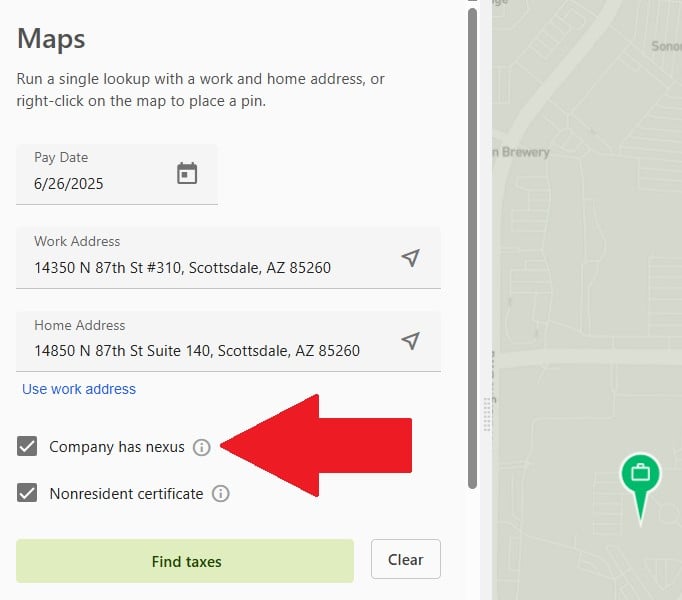
1. Navigate to the **Maps** tab.
2. Enter the employee's home address and work address in their respective fields (for example, `14350 N 87th St, Scottsdale, AZ 85260`). Use commas to separate street, city, and state within each address field.
3. Specify whether the employer has **Company has nexus** in the home state, and whether the employee has a **Nonresident certificate** on file for the work state, then click **Find taxes**. After the first lookup, the button label changes to **Search again**.
4. Review the results panel for the required and additional employer and employee taxes returned for each location.
**Separate address parts with commas.** Portal uses single-line address entry, so commas give the parser the best chance of reading the address correctly. Addresses without them may come back as invalid.
* **Recommended:** `14350 N 87th St #310, Scottsdale, AZ 85260`
* **Avoid:** `14350 N 87th St #310 Scottsdale AZ 85260`
](/prp/assets/images/39193919761172.png)
Before your first lookup, review [Global settings](/prp/portal/global-settings), which change which taxes are returned for everyone in your organization. You can also adjust [Maps display settings](/prp/portal/maps-settings) for how boundaries and map views are drawn.
***
## Step 2: Run your first maps lookup
Maps returns taxes for a single employee's home and work address pair.
1. Navigate to the **Maps** tab.
2. Enter the employee's home address and work address in their respective fields (for example, `14350 N 87th St, Scottsdale, AZ 85260`). Use commas to separate street, city, and state within each address field.
3. Specify whether the employer has **Company has nexus** in the home state, and whether the employee has a **Nonresident certificate** on file for the work state, then click **Find taxes**. After the first lookup, the button label changes to **Search again**.
4. Review the results panel for the required and additional employer and employee taxes returned for each location.
**Separate address parts with commas.** Portal uses single-line address entry, so commas give the parser the best chance of reading the address correctly. Addresses without them may come back as invalid.
* **Recommended:** `14350 N 87th St #310, Scottsdale, AZ 85260`
* **Avoid:** `14350 N 87th St #310 Scottsdale AZ 85260`
 See [Data returned from maps](/prp/portal/maps-data-returned) to interpret required vs. additional taxes, and [Required taxes](/prp/core-concepts/required-taxes) and [Reciprocity and nonresident certificates](/prp/core-concepts/reciprocity-and-nonresident-certificates) to understand how those two inputs change the result.
***
## Step 3: Run your first batch (optional)
Batch returns taxes for multiple home and work address pairs at once, either from a CSV upload or entered manually.
1. Navigate to the **Batch** tab and click **Import batch** to upload a CSV of employee data, or manually enter batch lines one-by-one.
2. Run the batch to process every home and work address pair in it.
3. Once the batch completes, download the results using a custom download template or the standard minimum wage rate export.
See [Batch overview](/prp/portal/batch) and [Create and run a batch](/prp/portal/batch-create-and-run) for the full batch creation and import walkthrough. For what Batch returns, see [Data returned from batch](/prp/portal/batch-data-returned).
***
## Next steps
How to read what a lookup returns, and what each tax in the response means.
How addresses are geocoded, and why an imprecise location changes the taxes returned.
More references:
* [Verify addresses and geocoordinates](/prp/portal/verify-addresses)
* [Batch CSV import template](/prp/portal/batch-csv-import)
For additional Batch guidance in the Client Support Center, see [Batch in Portal](/prp/portal/batch).
See [Data returned from maps](/prp/portal/maps-data-returned) to interpret required vs. additional taxes, and [Required taxes](/prp/core-concepts/required-taxes) and [Reciprocity and nonresident certificates](/prp/core-concepts/reciprocity-and-nonresident-certificates) to understand how those two inputs change the result.
***
## Step 3: Run your first batch (optional)
Batch returns taxes for multiple home and work address pairs at once, either from a CSV upload or entered manually.
1. Navigate to the **Batch** tab and click **Import batch** to upload a CSV of employee data, or manually enter batch lines one-by-one.
2. Run the batch to process every home and work address pair in it.
3. Once the batch completes, download the results using a custom download template or the standard minimum wage rate export.
See [Batch overview](/prp/portal/batch) and [Create and run a batch](/prp/portal/batch-create-and-run) for the full batch creation and import walkthrough. For what Batch returns, see [Data returned from batch](/prp/portal/batch-data-returned).
***
## Next steps
How to read what a lookup returns, and what each tax in the response means.
How addresses are geocoded, and why an imprecise location changes the taxes returned.
More references:
* [Verify addresses and geocoordinates](/prp/portal/verify-addresses)
* [Batch CSV import template](/prp/portal/batch-csv-import)
For additional Batch guidance in the Client Support Center, see [Batch in Portal](/prp/portal/batch).